Transitioning from ArcMap to ArcGIS Pro - Tips and Tricks
December, 2023
Download the PDF here
Introduction
This document provides tips and tricks for transitioning an Arc Hydro implementation from ArcMap to the ArcGIS Pro environment. It focuses on elements that impact Arc Hydro in particular. Most of these are "standard" ArcMap to ArcGIS Pro transition elements but are highlighted in the context of Arc Hydro implementation. Some are Arc Hydro implementation specific. This document is not intended to be a comprehensive guide for ArcMap to ArcGIS Pro migration. You should be familiar with Arc Hydro before continuing with this document.
Additional resources include:
"Arc Hydro: Project Development Best Practices" - This technical paper captures what works well when implementing Arc Hydro projects both in ArcMap and Pro.
- ArcGIS Pro has a default way in which it organizes data and project folders. This structure can be leveraged to support Arc Hydro best practices for data and folder organization (section 4.2 in the "Arc Hydro: Project Development Best Practices" document).
"Arc Hydro: ArcGIS Pro Project Startup Best Practices" - This technical paper discusses different ways to start an Arc Hydro project in Pro.
"Switching to ArcGIS Pro from ArcMap", Maribeth H. Price, Esri Press, 2019. - This book transitions a user who is familiar with ArcMap into the mechanics of using ArcGIS Pro. Rather than teaching ArcGIS Pro from the start, this book focuses on how ArcGIS Pro is different from ArcMap. Covering the most common and important workflows required for most GIS work.
Additional resources for general transition from ArcMap to ArcGIS Pro are referenced in Appendix 1.
Document history
Table 1. Document Revision History
| Version | Description | Date |
|---|---|---|
| 1 | First Version (DD) | 12/2020 |
| 2 | Second Version (DD). Minor updates. | 10/2021 |
| 3 | Third Version (DD). Minor updates. ArcGIS Pro 3.0 test. | 5/2022 |
| 4 | Fourth Version (DD). Minor updates. ArcGIS Pro 3.1 test. | 12/2023 |
Key Arc Hydro differences in ArcMap and Pro
Conceptually, Arc Hydro in ArcMap and in ArcGIS Pro are the same.
Same approach to data and project development.
Same workflows for data preprocessing.
Same Arc Hydro database structures (except geometric network being replaced by trace network).
Same general functionality.
Most of the tools are the same in their functionality with minor differences in look and feel to accommodate the two environments. Some differences do exist - these are usually implemented in Pro to:
Improve tool behavior in context of a workflow.
Remove deprecated functionality.
Improve performance.
Implement new functionality in Pro that is not available in ArcMap.
At this point in Arc Hydro development, both platforms are supported and with few exceptions, new tools are developed and maintained in both.
Key differences in Arc Hydro across the two platforms are related to:
Different management of layer and tool configuration.
Use of Python and ArcPy as main development platform in ArcGIS Pro vs. VB.net and ArcObjects in ArcMap.
Use of standard geoprocessing front end for tools in ArcGIS Pro vs. custom interfaces in ArcMap.
Lack of geometric network support in ArcGIS Pro (replaced with new trace network functionality).
If you are an existing Arc Hydro user in ArcMap, there is nothing significant that prevents you from transitioning to ArcGIS Pro, but you should carefully review your current Arc Hydro in ArcMap workflows and see if they are fully supported in ArcGIS Pro. If you see any missing functionality, please contact the Arc Hydro team via the Arc Hydro Community page.
Table 2. Key Arc Hydro differences in ArcMap and Pro
| Task | ArcMap | Pro |
|---|---|---|
| HydroID management | Editor extension for HydroID management of new features | Explicit management of HydroID for new features |
| Layer management | Via "tags" | None / via "default names" |
| Tracing | Geometric network | Trace network |
| Toolbar | ArcMap toolbar (many tools) | Pro ribbon (few tools) |
| Toolbox | Mix of Python, Model Builder, and .net tools | Mix of Python and Model Builder tools |
| Tool configuration | Extensive configuration capabilities through configuration XML and custom coding | Minimal configuration using standard geoprocessing capabilities |
HydroID management
Arc Hydro in ArcGIS Pro does not have an editor extension that will automatically populate HydroID for newly digitized features. Instead, add all new features (either with regular editing or appending/importing data into feature classes) and then run "Assign HydroID" from "Arc Hydro Tools Pro -> Attribute Tools -> ID Management". Use the "Overwrite HydroID" option to control overwriting of any existing HydroIDs in the target feature class.
Layer management
Arc Hydro in ArcGIS Pro does not have concept of a "tag", so there is no internal knowledge of which layers should be default inputs into Arc Hydro functions. Most of the Arc Hydro Pro tools have an input default name defined for a layer, so if your table of contents contains feature class of that name it will be selected as the default input. There is not special Arc Hydro code that manages that - it is standard geoprocessing tool capability and can be modified by the user if needed.
Toolbar
Only few functions that take interactively defined x,y location from the map as input (user's "click" on the map) are present in the Arc Hydro ribbon in Pro. All other functions are accessible through Arc Hydro Pro Toolbox.
Toolbox
Most of Arc Hydro ArcGIS Pro functions are implemented in Python and exposed as a script in the Arc Hydro toolbox/toolset. There are few functions implemented as Model Builder. Organization of the toolbox in ArcGIS Pro matches the organization in ArcMap, with minimal changes.
Tool configuration
There is no custom Arc Hydro tool configuration in ArcGIS Pro. All tool configuration is done using standard geoprocessing tool configuration capabilities and can be modified by the user if needed.
Starting an Arc Hydro project in ArcGIS Pro
By now, you should have read the Arc Hydro document "Arc Hydro: ArcGIS Pro Project Startup Best Practices". That document captures different ways to start an Arc Hydro project in ArcGIS Pro. In this section we will focus on how to start an Arc Hydro project in ArcGIS Pro when data and .mxd from an Arc Hydro project done in ArcMap exist and are to be used. This is covered in section 2.4 of the "Arc Hydro: ArcGIS Pro Project Startup Best Practices" document. It is presented here but using a different dataset as an example - this dataset will be referenced later in this document.
Leveraging an existing Arc Hydro dataset and .mxd project
The intent with this approach is to maintain the same folder and naming structure developed in ArcMap. A typical Arc Hydro data structure might look like the one below. In the example, the "AMGN" folder contains the "Layers" folder with all the rasters, the "HUC18070203.gdb" with vector and tabular Arc Hydro data, and "HUC18070203.mxd" ArcMap project.

The goal is to use the same main folder (AMGN) to contain the ArcGIS Pro project using the existing geodatabase as the default project geodatabase and "Layers" folder for storing rasters. The name of the ArcGIS Pro project will match the name of the geodatabase ("HUC18070203.aprx"). While this was the recommended project structure in ArcMap it is not as critical in ArcGIS Pro but is still a good practice to keep and helps with ArcMap to ArcGIS Pro transition (for consistency).
Start ArcGIS Pro and select new Map template.
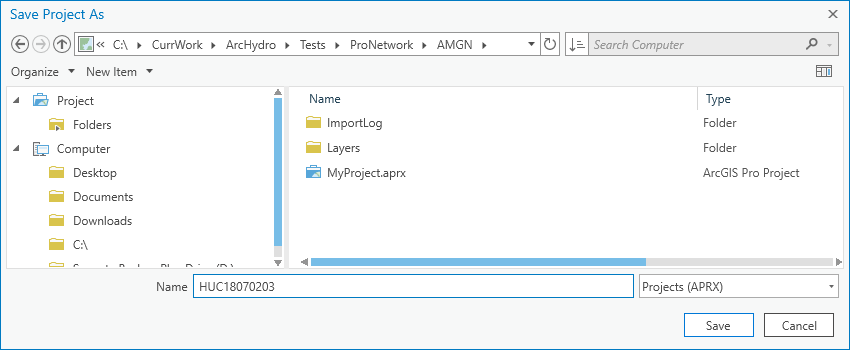
Specify the name of the new project and the folder in which to create it. Set "Create a new folder for this project" check box unchecked. Note that the specified project name can be anything EXCEPT the name of the existing geodatabase in the target folder. In this case, we are naming the project "MyProject" and placing it into "C:\CurrWork\ArcHydro\Tests\ProNetwork\AMGN" folder.

Once the project is created, click on "Insert -> Import Map" (main ArcGIS Pro tab).
Navigate to the existing ArcMap mxd file you need to import (in this case "C:\CurrWork\ArcHydro\Tests\ProNetwork\AMGN \HUC18070203.mxd") and press "OK".

Click "Project -> Save As" (from the main ArcGIS Pro tab).
Specify the name of the new project and the folder in which to create it. The specified project name should match the name of the geodatabase in the folder where the project will be saved. In this case, we are naming the project "HUC18070203" and placing it into "C:\CurrWork\ArcHydro\Tests\ProNetwork\AMGN" folder.
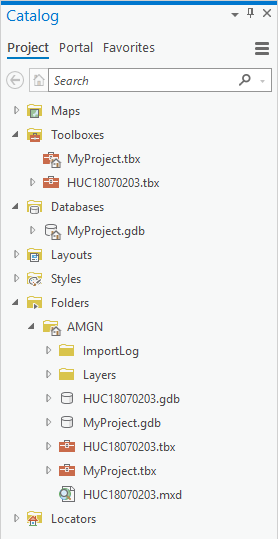
Create a new toolbox called "HUC18070203.tbx" in the project folder (via Catalog).
ArcGIS Pro Catalog should look like this:
Click on "Project -> Options -> Current Settings" (from the main ArcGIS Pro tab).
- Repoint the "Default geodatabase" and "Default toolbox" to "HUC18070203.gdb" and "HUC18070203.tbx"). The form should look like:
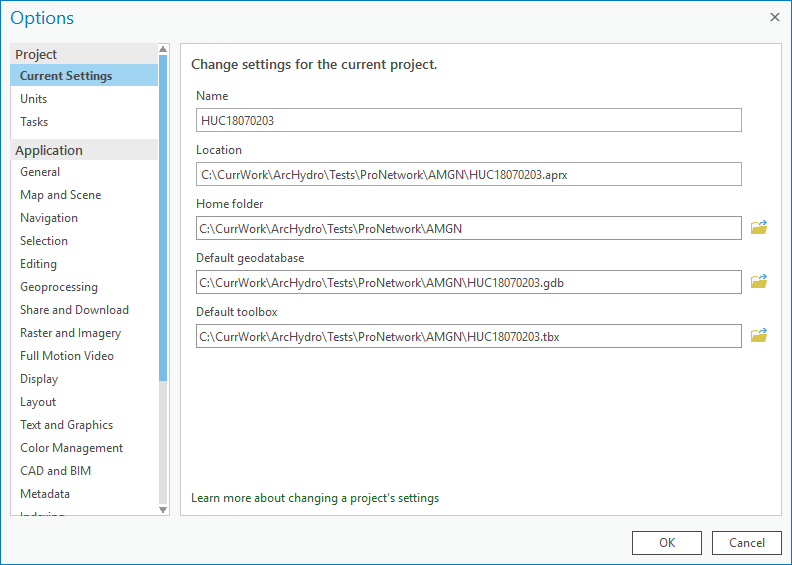
- Click "OK" to apply changes
Click "Save" to save the project.
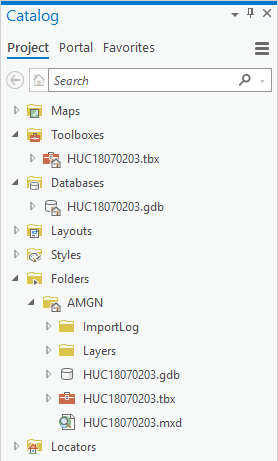
Use the catalog view to inspect changes.
Delete all references to "MyProject" (e.g., .tbx, .gdb, and .aprx files - some might have to be deleted from the file manager).
The final folder structure should look like:
- An optional step is to remove the .mxd file. It is not recommended to keep using both ArcMap and ArcGIS Pro versions of the same Arc Hydro project.
Tracing
Introduction
One of the key differences (from Arc Hydro viewpoint) in the geodatabase and analytical support between ArcMap and ArcGIS Pro is management of networks and tracing. ArcGIS Pro does not support geometric networks that were the foundation of the Arc Hydro data model and some of the Arc Hydro analytical tools.
ArcGIS Pro 2.6 introduces Trace Networks. The trace network in ArcGIS Pro provides geometric network capabilities that the Arc Hydro data model and tools used in ArcMap. While there is no 1-to-1 equivalency, trace network allows similar capabilities and as it evolves with future releases of ArcGIS Pro, additional functionality will be available that was not possible with geometric networks.
For overview of trace networks, please read "Introducing the Trace Network with ArcGIS Pro 2.6 (note that this blog has been updated several times and discusses additional trace network capabilities past initial release in ArcGIS Pro 2.6):
This section presents a quick review on how to mobilize trace network in the context of typical Arc Hydro workflows.
A geometric network developed in ArcMap will be used as a starting point to demonstrate the differences between the two (Section 4.2). Trace network can also be built within ArcGIS Pro from basic feature classes - that will be demonstrated in Section 4.4.
Converting geometric network to trace network
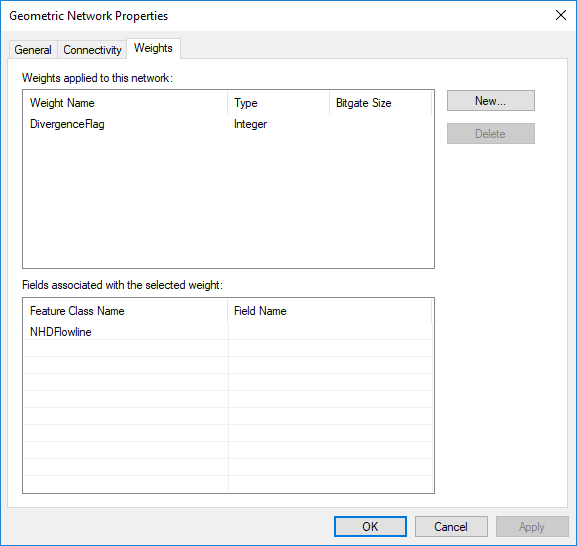
The initial geometric network used in the example was built using NHD data (using NHDPlusHR packaged NHD data). NHDFlowline feature class residing in the "Hydrography" feature dataset was used to build geometric network called "NHDFlowline_Net". It has the following properties:
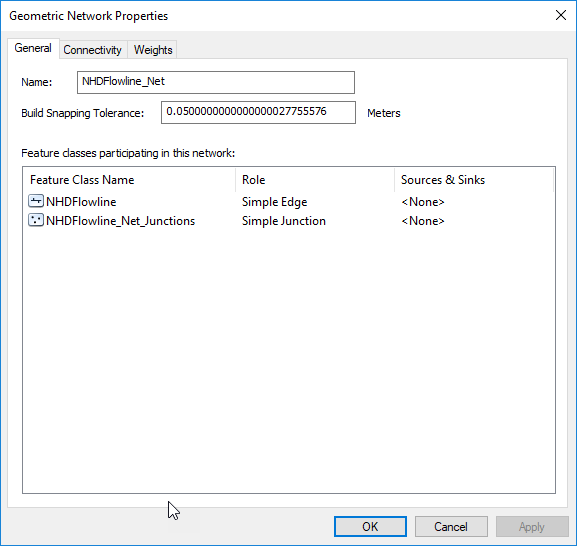

This network is part of the "HUC18070203.gdb" geodatabase discussed in section 3.1.
Note that geometric networks can be seen in geodatabase via the ArcGIS Pro interface but are not supported. Also note that the following operation will delete the geometric network from the geodatabase so make sure you make a backup of the geodatabase in case you need it in ArcMap since trace network is not supported there.
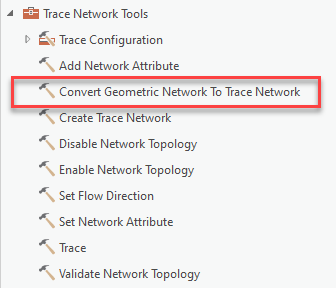
- From ArcGIS Pro, use the "Trace Network Tools" toolbox (available in ArcGIS Pro 2.6 and above) and run "Convert Geometric Network to Trace Network".
- Navigate to "HUC18070203.gdb\Layers" feature dataset and select "NHDFlowline_Net" as the input geometric network. Name the output trace network as "NHDFlowline_TN".

- Run the tool.
Review the geodatabase in Catalog (you might have to refresh the view).
The geometric network is gone, and the trace network is created.
Right click on the "NHDFlowline_TN" trace network and select "Properties".
What are participating feature classes and of what type?
Is network topology enabled and how many features participate in the network?
How many "dirty areas" are there?
What are the network attributes?
Before trace network can be used, its topology needs to be enabled. Run "Enable Network Topology" (from the "Trace Network Tools" toolset) and select "NHDFlowline_TN" as input trace network.
Review network properties again.
Is network topology enabled and how many features participate in the network?
How many "dirty areas" are there?
Review all the layers added to the map when the network was added (add the network to the map if necessary).
What do "dirty areas" represent?
Can you identify the problems?
Review "point" errors.
Review "line errors".
Run "Validate Network Topology" and select "NHDFlowline_TN" as input trace network. Make sure you validate the full extent of the network.
Review network properties again.
Is network topology enabled and how many features participate in the network?
How many "dirty areas" are there?
Ideally, you will "clean" all the "dirty areas". As you are making edits, run "Validate Network Topology" to see if your edits have fixed the issues. This function can operate on the local extent only, so you can do quick checks on a subset of the data (where the edits have been made).
In the "Trace Network" ribbon, run "Display Flow Direction".
- Zoom in and inspect the direction arrows. Do they make sense?
Fundamentals of tracing through trace networks
This section describes basic tracing capabilities in trace networks. Make sure that the trace network is established, enabled, and validated (if you performed steps in section 4.2, that will be the case).
In the "Trace Network" ribbon, click on "Trace Locations -> Starting Points".
A "Trace Locations" pane will open.
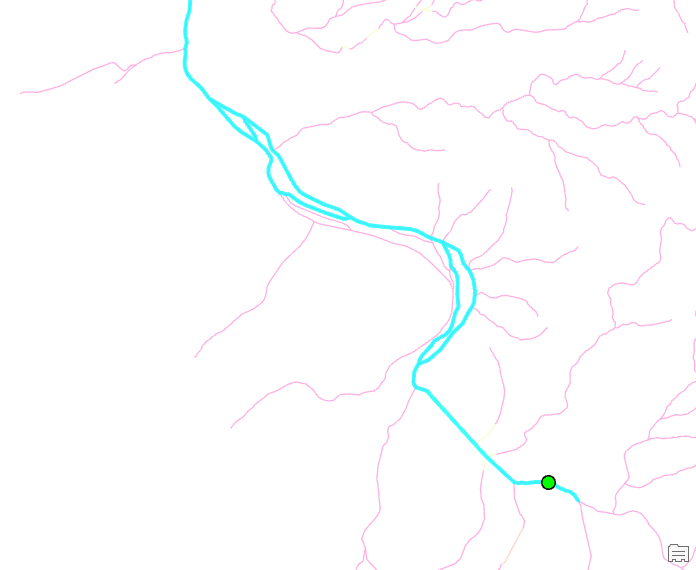
- Click on an edge where you would like to start a trace (select something on a main river, close to the downstream end of the system).
Once the point is placed, in the "Trace Network" ribbon, run "Upstream". Accept defaults for the geoprocessing tool and run it.
Review the results (selected set of features).
If the trace failed, why did it fail? Have you "cleaned" all the errors and validated the network topology after the edits?
If there are still errors in the network, uncheck "Validate Consistency" on the trace tool's form and run the tool again.
- This allows tracing through "errors".
Clear selection in the map and clear "Starting Points" from the "Trace Locations" pane (click on the red "x" next to the displayed feature).
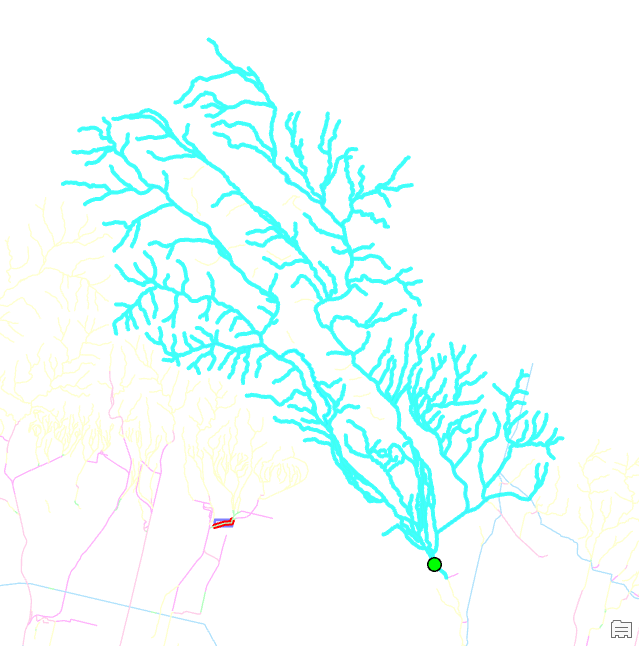
Identify location upstream of flow splits (look for lines with "DivergenceFlag" = 1 or look at the "DivergenceCode" <>0 in NHDPlusFlowlineVAA if necessary).
Add a network start point upstream from a divergence.
Trace downstream. Note that multiple paths are selected at divergences.
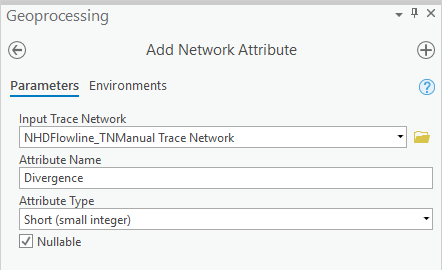
To be able to use a value from a field to control tracing, it needs to be set as a network attribute.
Run "Disable Network Topology" on NHDFlowline_TN.
Run "Add Network Attribute" and create attribute name called "Divergence" of short type and allow it to be nullable.
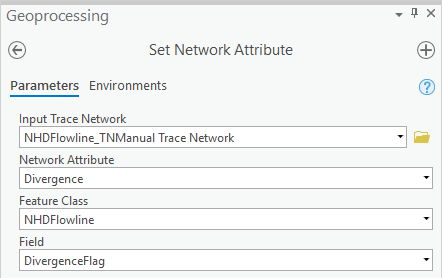
Run "Set Network Attribute" and set network attribute "Divergence" to be from field "DivergenceCode" from "NHDFlowline" feature class (if that field is not in the NHDFlowline feature class add it from the NHDFlowlineVAA table using NHDPlusID attribute as join field).
Run "Enable Network Topology" on NHDFlowline_TN.
Rerun the trace downstream tool but:
Check off "Include Barrier Features".
Under "Advanced Options" fill in the "Condition Barriers" section. Use "Divergence" = 1 as the conditional barrier.
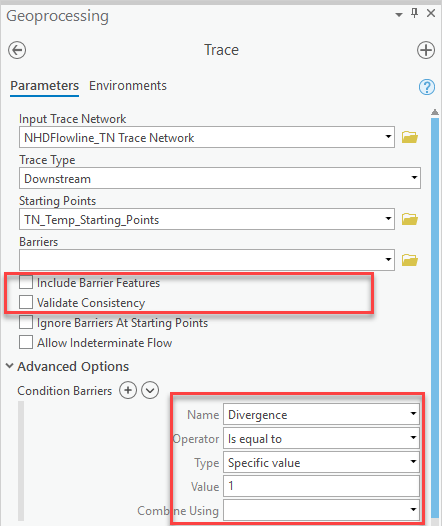
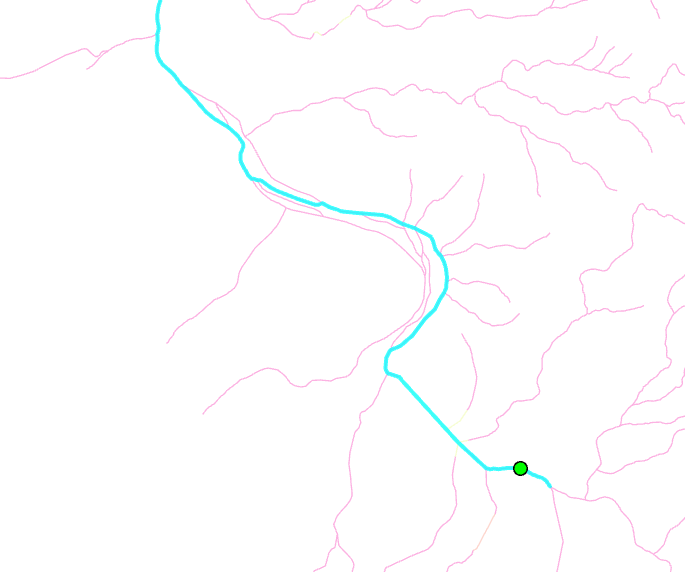
- Notice that now only a single downstream trace path is defined.
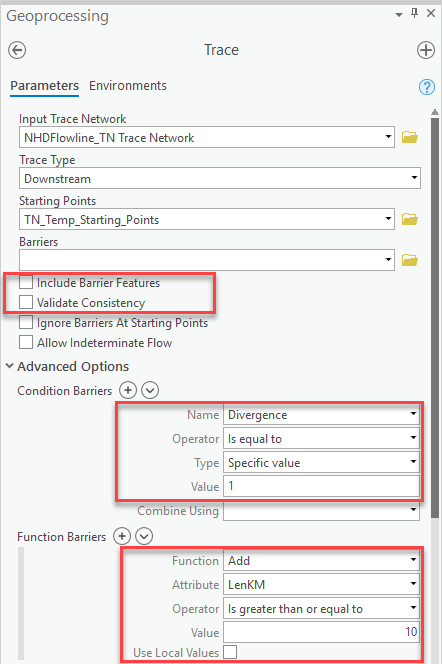
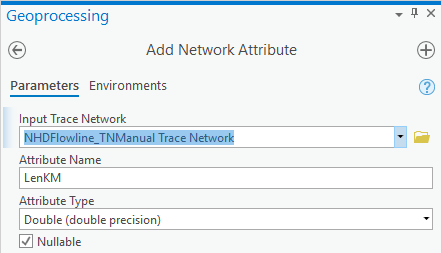
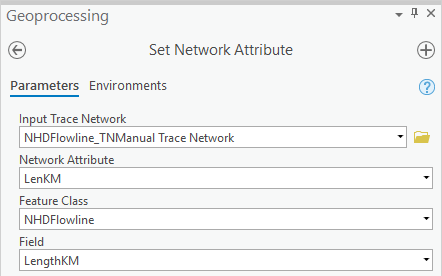
Network attributes allow you to constrain the trace. In the following example, we will limit the downstream trace to 10km. Notice that NHDFlowline has field "LengthKM" that can be used for that. If such a field did not exist, it could be easily created and calculated using standard geometry calculation capabilities. Follow this procedure to set up the trace network for trace containment using length in kilometers (note that these are exactly the same steps we did in item #8 - in a normal process, you would add and set all network attributes at once instead of one at the time):
Disable network topology.
Add network attribute "LenKM" (double, allow null).
Set network attribute "LenKM" to be from field "LengthKM" from "NHDFlowline" feature class.
Enable network topology.
Rerun the trace downstream tool but:
Check off "Include Barrier Features".
Under "Advanced Options" fill in the "Condition Barriers" section. Use "Divergence" = 1 as the conditional barrier.
Under "Advanced Options" fill in the "Function Barriers" section. Use "LenKM" => 10 as the functional barrier. Note that the operator is "Is greater than or equal to" since this is the condition to place the barrier (so we limit the overall distance to less than 10 km).
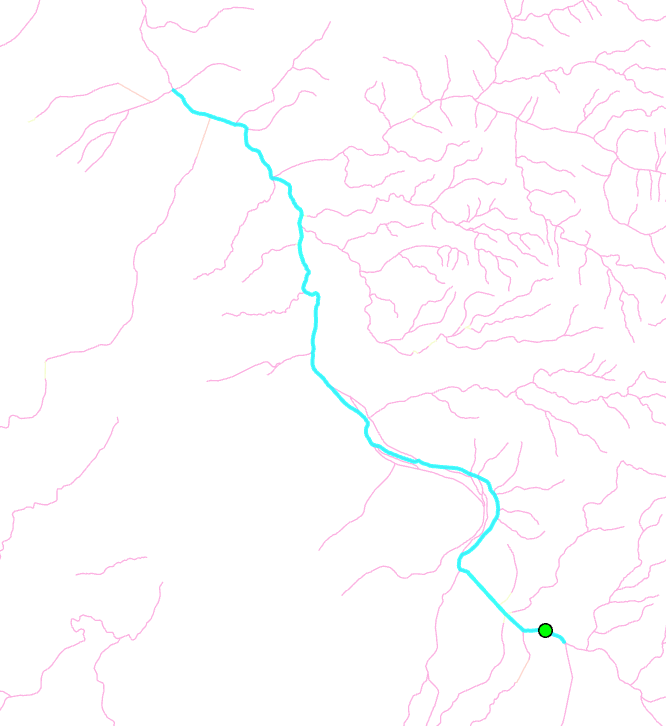
- The result shows the length limited main stem downstream trace.
Building the trace network from the ground up
If a geometric network did not exist in the geodatabase as input for trace network creation, a trace network can be built from the ground up. We will use the same feature class and attributes as in section 4.2. First, delete the existing trace network (NHDFlowline_TN) since a feature class can participate only in one network (do it from Catalog). If necessary, remove all trace network artifacts from the map and geodatabase (e.g. FlowDirection arrows, Starting_Points, Barriers).
The network will consist of only NHDFlowline feature class and we will use "DivergenceCode" and "LengthKM" fields as network attributes. The following functions are all run from the "Trace Network Tools" toolset.
- Create Trace Network (NHDFlowline_TNManual).
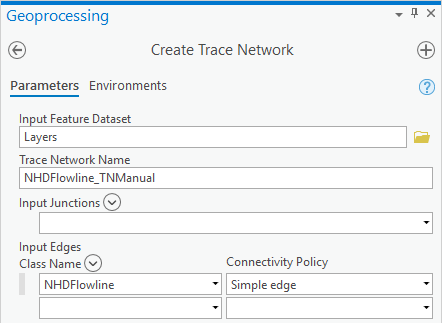
- Add Network Attribute (Divergence).
- Add Network Attribute (LenKM).
- Set Network Attribute (Divergence).
- Set Network Attribute (LenKM).
- Enable Network Topology.

Inspect the network in Catalog.
Is topology enabled?
How many features participate in the network from what feature classes?
Are network attributes properly configured?
Inspect the network in Contents.
Point and line errors.
Dirty areas.
Flow direction (run "Display Flow Direction").
Are there any differences from the network created by geometric network conversion in section 4.2?
Perform traces from section 4.3.
- Are there any differences in behavior and results?
What other feature classes and attributes might be useful in network analyses? Think of features that might prevent hydro traces, like dams or culverts if interested in fish migration or similar types of analyses.
Note that with proper design and planning of the network (specially its attributes), its creation can be very straightforward and linear.
Creating a network diagram
Trace networks enable building of network diagrams. There are few rules to be aware of:
Diagrams are built from selected features in the network.
They cannot be built over "dirty areas".
As an example, we will build a diagram from a trace result.
- Select a point on the network and trace upstream. Make sure that the trace does not go over any dirty areas.
- On the Trace Network ribbon, click on "New" under "Diagram" section and select "Basic".

A new network diagram is created.
On the Network Diagram ribbon, click on "Store" to store the diagram (give it a name - e.g. "Trace Result 1").
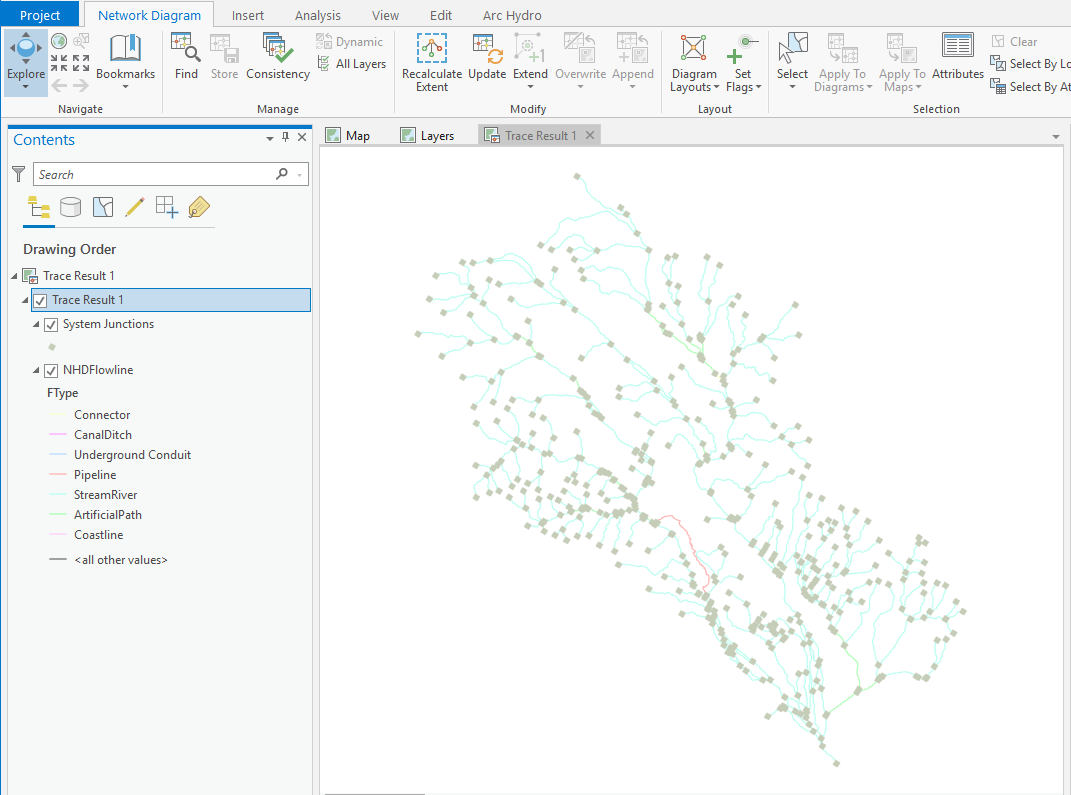
On the Network Diagram ribbon, click on "Diagram Layouts" and select "Smart Tree".
Accept the defaults for the geoprocessing tool and run it.
The figure below shows the diagram with system junctions turned off for better visibility.
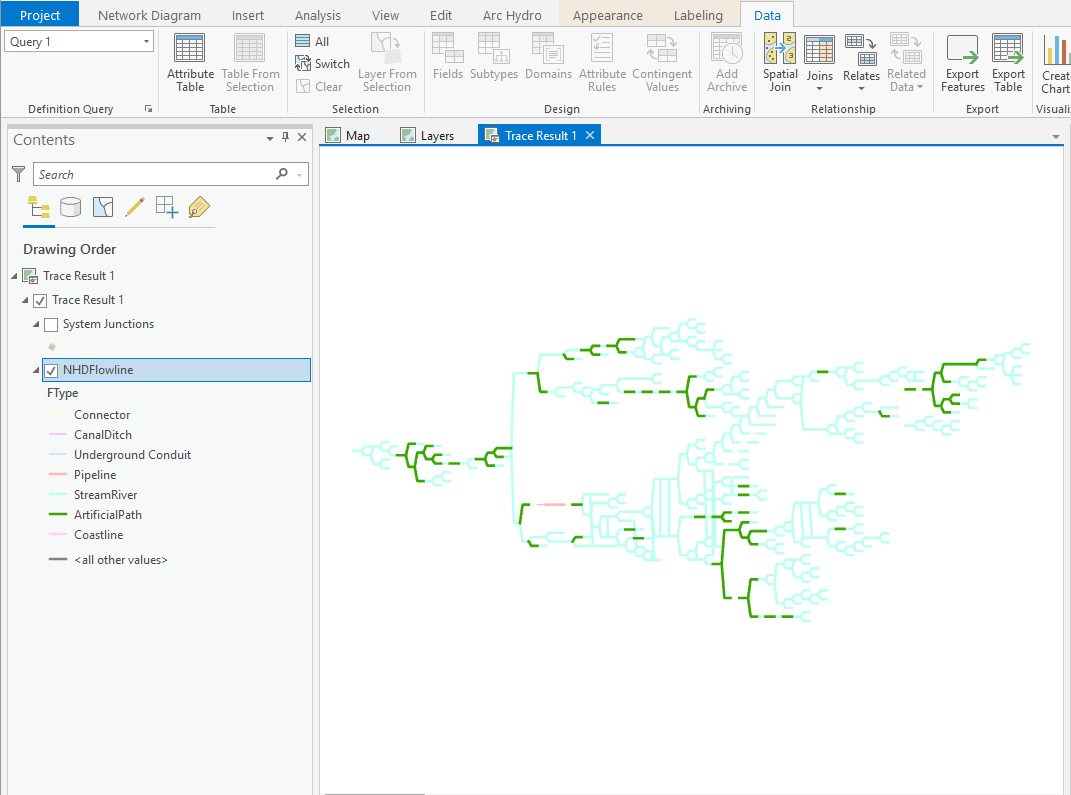
Review the diagram.
Does it help with understanding the system morphology better than the geographic representation?
Zoom in to see the detail.
Experiment with other types of diagram layouts.
Explore other capabilities of network diagrams.
Some trace network observations with respect to geometric networks
To build, edit, and use trace network, you need standard or advanced licensing of ArcGIS Pro.
All vertices in a line feature participating in a trace network are important, not just those vertices where edges and junctions participating in the network connect. This makes the "cleanliness" of the features more important in trace networks than it was for the geometric networks. Topology that was "clean" in the geometric network might not be clean in the trace network.
Trace networks have distinct management of topology (errors and dirty areas).
When building a trace network, you:
Create trace network.
Optionally add AND set network attributes.
Enable network.
After edits, you validate the network.
You can ignore the "errors" in the trace network and perform tracing through "errors", but the results might be incorrect.
By default, flow direction in edges will be set to "With digitized" once the network topology has been enabled and validated. Explicit attribute "Flow direction" (FLOWDIRECTION) will be created in the network features and used to control the flow direction in the feature when performing traces. Users can manage this field as any other field and set the value for each feature if necessary. The values are controlled by an integer domain (1 = "With digitiezed", 2 = "Against digitized", and 3 = "Indetermined").
Not all types of traces that were available in the geometric networks are available in trace networks.
Trace networks support richer tracing options than geometric networks (for those traces that are supported).
Trace networks support generation of network diagrams.
ArcGIS Pro implementation tidbits
This section presents a diverse collection of ArcGIS Pro workflows that are often used with Arc Hydro in ArcMap and can be confusing for first time ArcGIS Pro users.
Add Arc Hydro toolbox to the project toolboxes
After Arc Hydro tools are installed, both the Arc Hydro ribbon and toolbox ("Arc Hydro Tools Pro") are available for use in ArcGIS Pro. The toolbox is accessible as any other toolbox in ArcGIS Pro, primarily via "Geoprocessing -> Toolboxes" pane. If you want to add Arc Hydro toolbox to your project toolboxes, follow this procedure:
Go to "Catalog" pane
Right-click on "Toolboxes" and select "Add Toolbox".
Navigate to the location where Arc Hydro toolbox has been installed (typically C:\Program Files\ArcGIS\Pro\Resources\ArcToolBox\Toolboxes) and select "Arc_Hydro_Tools_Pro.tbx".
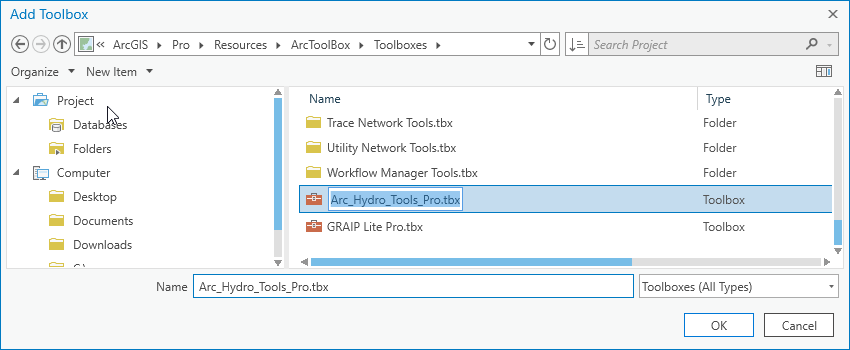
- Click on "OK" to add the toolbox to your collection of project toolboxes.
Once the Arc Hydro toolbox is in your project you have full access to Arc Hydro tools for copying and editing (you cannot copy Arc Hydro tools directly from Geoprocessing pane).
Editing Arc Hydro tools
Depending on your system privileges and how you started ArcGIS Pro, you might not be able to edit Arc Hydro tools directly in their native location (you need to be system administrator to be able to do that). It is also not recommended to edit the tools directly, but rather a copy of it. To create a copy of an Arc Hydro tool, follow this procedure:
Add Arc Hydro toolbox to you project set of tools (section 5.1 in this document).
Navigate to the Arc Hydro tool you are interested in, right-click on it, and select "Copy".
Navigate to the toolbox you want to place the tool in (e.g. your default project toolbox or any other toolbox you have edit privileges for), right-click on it, and select "Paste".
- This will create a copy of the selected tool.
Right-click on the tool and select "Properties".
- Notice that the source code for the tool is still pointing to the original source code for the Arc Hydro tool.
Right-click on the tool and select "Edit".
- In the editor, "save as" the tool and place it in the directory where you have write privileges. Note the location of the target directory. It is recommended that you change the name of the python file to avoid any possible confusion on which version of the tool is being run (e.g. add your initials at the end of the file name).
Close the text editor.
Right-click on the tool and select "Properties".
Under "General", change the location of "Script File" to point to the location and name where you saved the copy of the code (step 5a).
It is recommended that you change the name of the tool to avoid any possible confusion on which version of the tool is being run (e.g. add your initials at the end of the tool name).
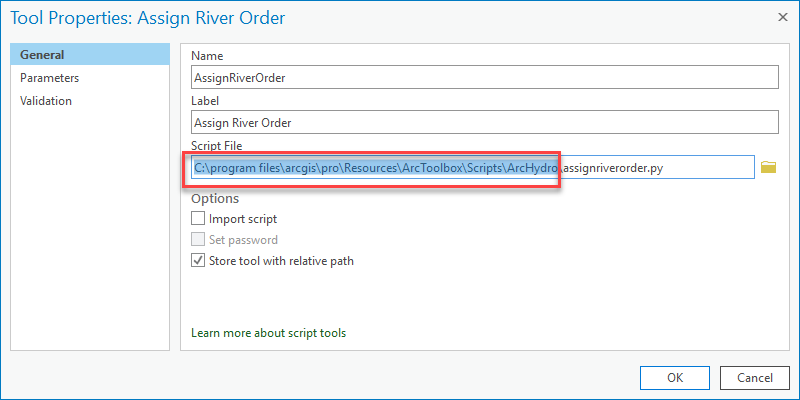
You have now created a copy of the Arc Hydro tool that you can edit anyway you want without impacting the original tool.
Geoprocessing and other options
The "Options" pane is accessible through "Project -> Options" in the main ArcGIS Pro ribbon. Options of interest:
Current Settings:
- Location of default geodatabase and toolbox.
Map and Scene:
Add layer
- Make newly added layers visible by default. Check it off if processing large datasets in batch operations.
Geoprocessing:
Allow geoprocessing tools to overwrite existing datasets. Check it on.
Add output datasets to an open map. Check it on.
Script editor. Point to your favorite script editor.
Write geoprocessing operations to XML log file. Check it on if you are interested in reviewing the operations outside of the ArcGIS Pro environment.
Display:
- Local cache. Note potentially large cache being stored. Might be worth clearing it from time to time.
User interface (for all elements):
- Position of the first view opened in the project. You can control whether to place the window in the active map or separately.
Customize the Ribbon. Add commands to existing ribbon elements.
Quick Access Toolbar. Add commands to Quick Access Toolbar.
Required vs. optional inputs
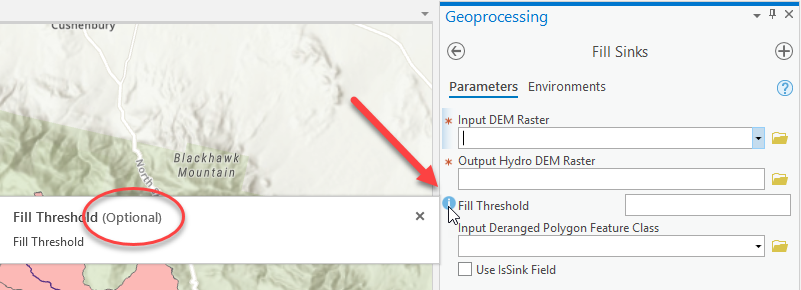
In ArcMap, optional inputs for a geoprocessing tool would be identified as such on the geoprocessing form after the parameter name.
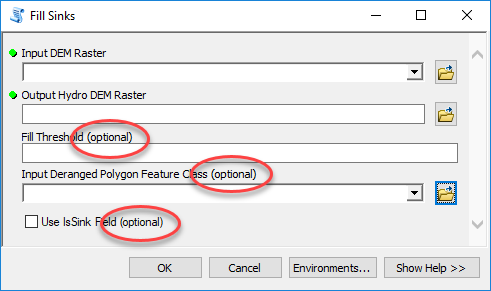
In ArcGIS Pro, you have to highlight the information about the parameter to see if the parameter is optional (hover over the "i" next to the to parameter name).
Layer and feature class properties
In general, layer or feature class "Properties" in ArcGIS Pro work similar as in ArcMap. A notable difference is that to view an attribute list, you access it through "Design -> Fields" and not through "Properties" (when right-clicking on the layer (Contents) or feature class (Catalog)).
To set up display field to be used for feature pop-up (identify), go to "Layer Properties -> Display -> Display field".
To configure feature pop-up (identify), right click on the layer in "Contents" pane and select "Configure Pop-ups". Very detailed configuration is possible.
Creating a hillshade/shaded relief
Creating a hillshade was one of the first operations when dealing with terrain processing in Arc Hydro in ArcMap. The easiest way was to use "Image Analysis" (under "Windows" in main ArcMap interface), select the digital elevation model (DEM) in the list of rasters, and then click on the "Shaded Relief" icon. This would generate a temporary raster.
In ArcGIS Pro, the process is slightly different. First, if you are using a default base map, it will include the "World Topographic Map" and "World Hillshade". The "World Hillshade" might be good enough for quick visualization of the topography and development of explicit hillshade might not be needed.
If you need to create a hillshade (often if your DEM is more detailed than the one used for the "World Hillshade", or if you have hydro-conditioned the DEM and want to see the impact), there are several ways of doing it.
The article "Create Amazing Hillshade Effects Quickly and Easily in ArcGIS Pro" presents one of the ways to do it.
[https://www.esri.com/about/newsroom/arcwatch/create-amazing-hillshade-effects-quickly-and-easily-in-arcgis-pro/]
The following steps follow the same pattern as the article (using raster function instead of a geoprocessing function that creates a new raster) but generates a shaded relief instead of a hillshade.
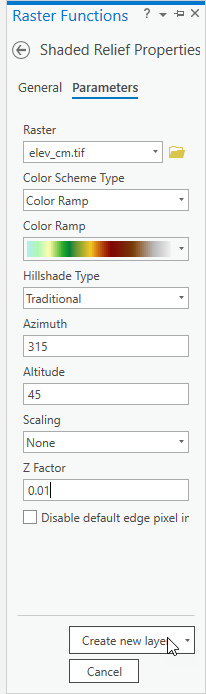 Open the Raster Functions pane from "Analysis" on the main ArcGIS Pro ribbon.
Scroll to the bottom and expand the "Surface" functions and select the "Shaded Relief" option.
Set Raster to your DEM dataset.
Set Hillshade Type to Traditional or Multidirectional, as desired.
Set Scaling to None if you are making a map at a single map scale (such as a printed map) or select Adjusted if you are making a multiscale map (such as a web map).
Set Z Factor to a higher number to exaggerate the height variation in the terrain, or use it to convert the elevation units to the x,y linear units if they happen to be different. In this example, the factor is set to 0.01 since the vertical units of the DEM are in centimeters.
Click the Create new layer button at the bottom of the Raster Functions pane to create a new layer in the current map. Note that this creates a new display of the processed data�it is not a new raster dataset.
ArcGIS Pro for developers
While these tidbits are not directly Arc Hydro related, we find them useful when developing Arc Hydro tools and techniques and while debugging.
Log file
It is useful to write geoprocessing operations to XML log file (see section 5.2 how to turn it on/off) - that will allow you to review the full report for each geoprocessing function. Note that the logs are stored in the "%APPDATA%\ESRI\ArcGISPro\ArcToolbox\History" directory. Also, these logs are verbose and while not large, they can accumulate quite quickly, so it is recommended that during normal operations, this option is checked off.
Copy path
Getting a full path to a layer is often used when executing operations from a python command line.
Click on the data element (feature class/table/raster/...) of interest in the "Catalog" pane.
- Note it must be the "Catalog" NOT "Content" pane.
Under "Map" in the main ArcGIS Pro ribbon, click on "Copy Path". This will place the full path to the data element onto the clipboard.
Notebooks
Jupyter notebooks are fully integrated into ArcGIS Pro 2.6 and higher (and branded as "ArcGIS Notebooks"). The article "ArcGIS Notebooks in ArcGIS Pro (2.6)" presents an overview of working with notebooks in ArcGIS Pro 2.6.
https://community.esri.com/docs/DOC-15279-arcgis-notebooks-in-arcgis-pro-26
Notebooks can be very useful when developing and documenting new workflows.
Raster Cell Iterator
Raster cell iterator (RCI) allows you to access individual cells in a raster. RCI has been available since ArcGIS Pro 2.5. The article "Introducing the Raster Cell Iterator" presents an overview of working with RCI.
[https://community.esri.com/community/gis/analysis/spatial-analyst/blog/2020/02/06/introducing-the-raster-cell-iterator]
Appendix 1. General ArcMap to ArcGIS Pro transition references
For general ArcMap to Pro transition, you can review the following resources (and there are many more).
Book:
"Switching to ArcGIS Pro from ArcMap", Maribeth H. Price, Esri Press, 2019.
Training:
Training seminar: "Going Pro: ArcGIS Pro Essentials for ArcMap Users": https://www.esri.com/training/catalog/590901ecdb250232197d2326/going-pro%3A-arcgis-pro-essentials-for-arcmap-users/
Learning plan: "Migrate to ArcGIS Pro": https://www.esri.com/training/catalog/5b296eb4e620ca23e65420dc/migrate-to-arcgis-pro/
Instructor lead (2 day): "Migrating from ArcMap to ArcGIS Pro": https://www.esri.com/training/catalog/59161f89dfcdee7bac39d5b3/migrating-from-arcmap-to-arcgis-pro/
Learn lesson:
Migrate from ArcMap to ArcGIS Pro (1 hour): https://learn.arcgis.com/en/projects/migrate-from-arcmap-to-arcgis-pro/
Documentation:
ArcGIS Pro -> Get Started -> General -> For ArcMap users: https://pro.arcgis.com/en/pro-app/get-started/migrate-to-arcgis-pro.htm
ArcGIS Pro Migration Guide: https://www.esri.com/content/dam/esrisites/en-us/media/pdf/implementation-guides/arcgis-pro-migration-guide.pdf
ArcGIS Pro Terminology Guide: https://www.esri.com/training/catalog/5949c0c3debdf6699b595553/arcgis-pro-terminology-guide/