Setup for Geoenrichment in Azure Databricks#
The BDT Enrichment Functions require an additional, separate license for the Business Analyst data. Please contact the BDT team at bdt_support@esri.com if interested. This guide describes how to enable a cluster with this data.
Prerequisites#
This guide assumes BDT is already installed and set up in an environment of choice. If this is not done see the setup guide for more information.
For best performance, it is recommended to use a cluster with at least 64GB of memory (128GB if also using the LMDB). It is also recommended to use a cluster with many smaller machines (fewer cores) rather than a few large machines.
Please be sure to obtain the file containing postgres dumps with the BA data from the BDT team.
This file should be stored in Azure Blob Storage.
Ensure Docker is installed.
1. Setup init script#
Similar to deploying the LMDB, the enrichment data is copied to a postgres database on each cluster node. An init script can be set up to perform this.
Please contact the BDT team at bdt_support@esri.com to receive this init script.
2. Add the init script to a cluster#
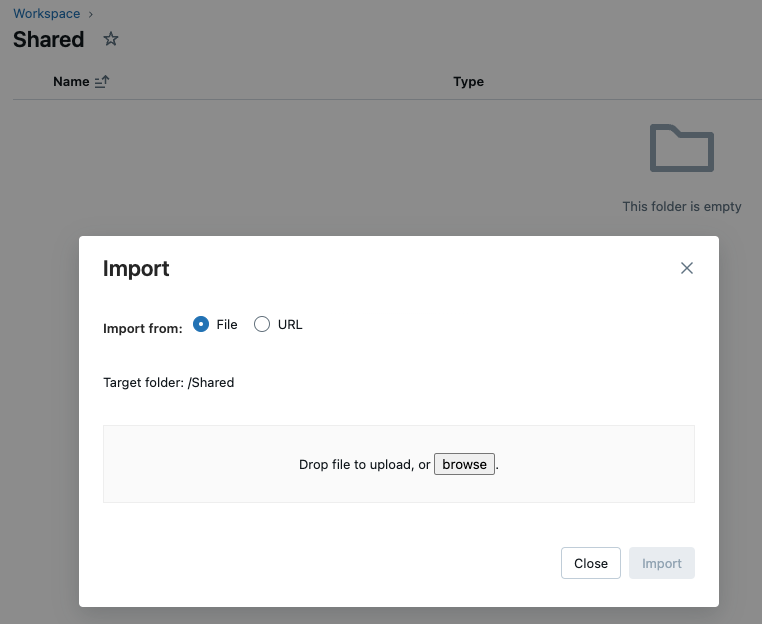
Once the init script is obtained, import the init script into Workspace

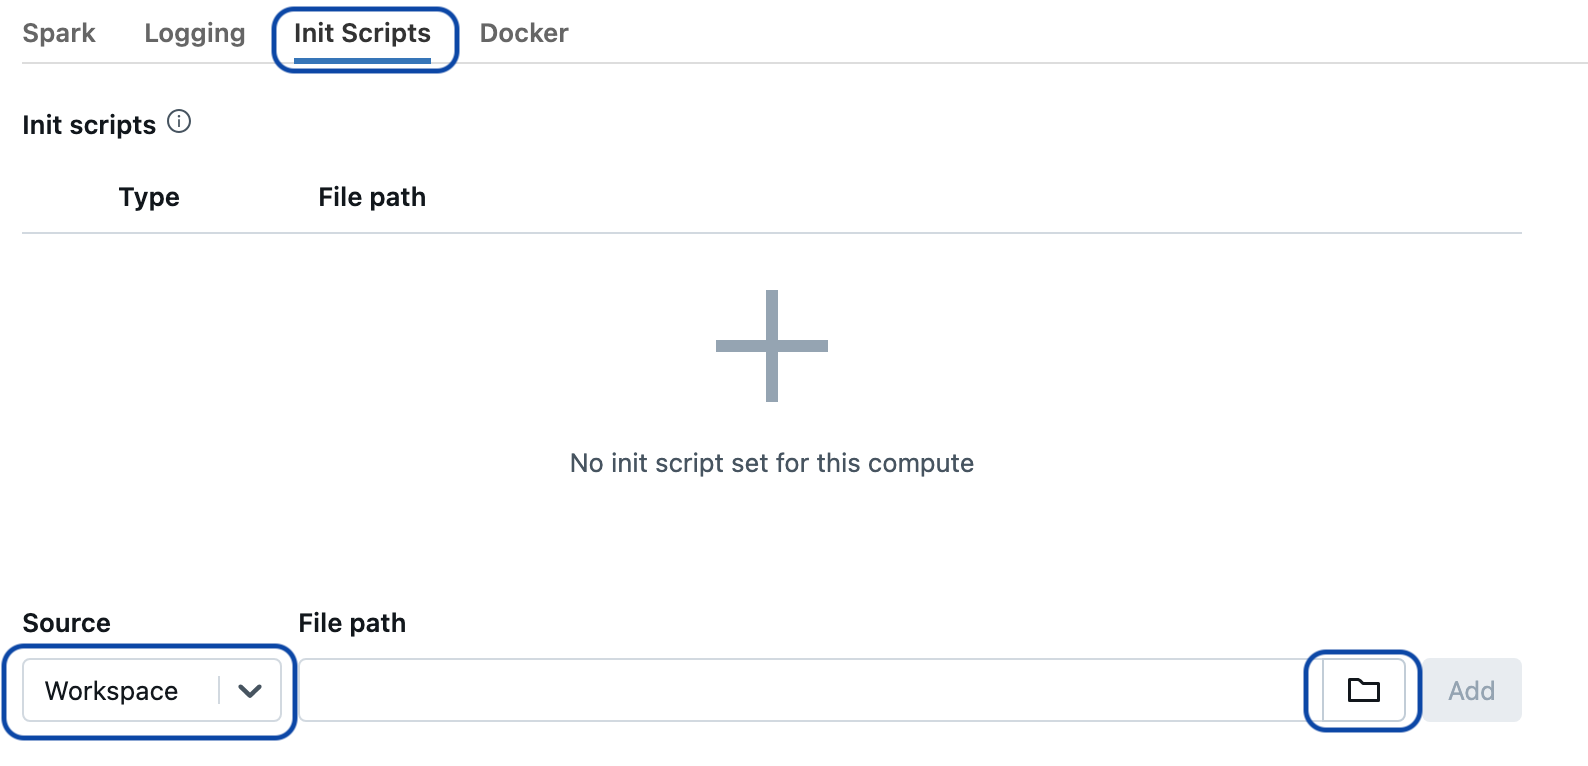
In cluster creation, select the init scripts tab, change the source to workspace, click on the folder icon to select the init script that was just imported, and finally click “Add”.
The cluster is now enabled with the geoenrichment init script.
3. Enable container services on the cluster#
There is no option to do this through the databricks UI, so it must be done via the API.
First, go to the HTTPie website and click “Go to App” to use the web app.
Once in HTTPie, change the HTTP command mode to
PATCH. Then, add the correct URL to the “Send” bar. The URL needs to be in the formathttps://<databricks-instance>/api/2.0/workspace-conf.The
<databricks-instance>is located in the URL of the Databricks workspace. For example,https://adb-12334512345.1.azuredatabricks.net/

Second, select the “Auth” tab, then select “Bearer token” at the bottom.
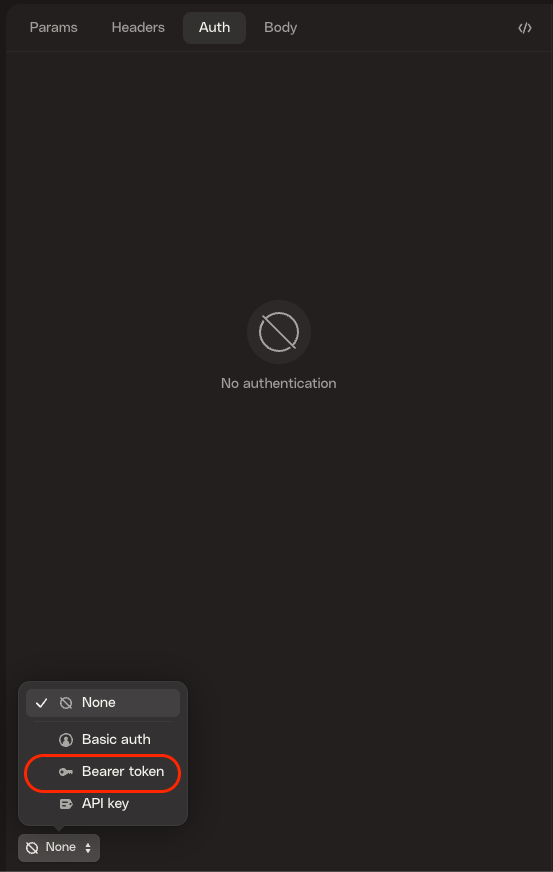
Once “Bearer token” has been selected, an empty line to put the token will appear. The token needed is another Databricks User Access Token.
Create a Databricks User Token:
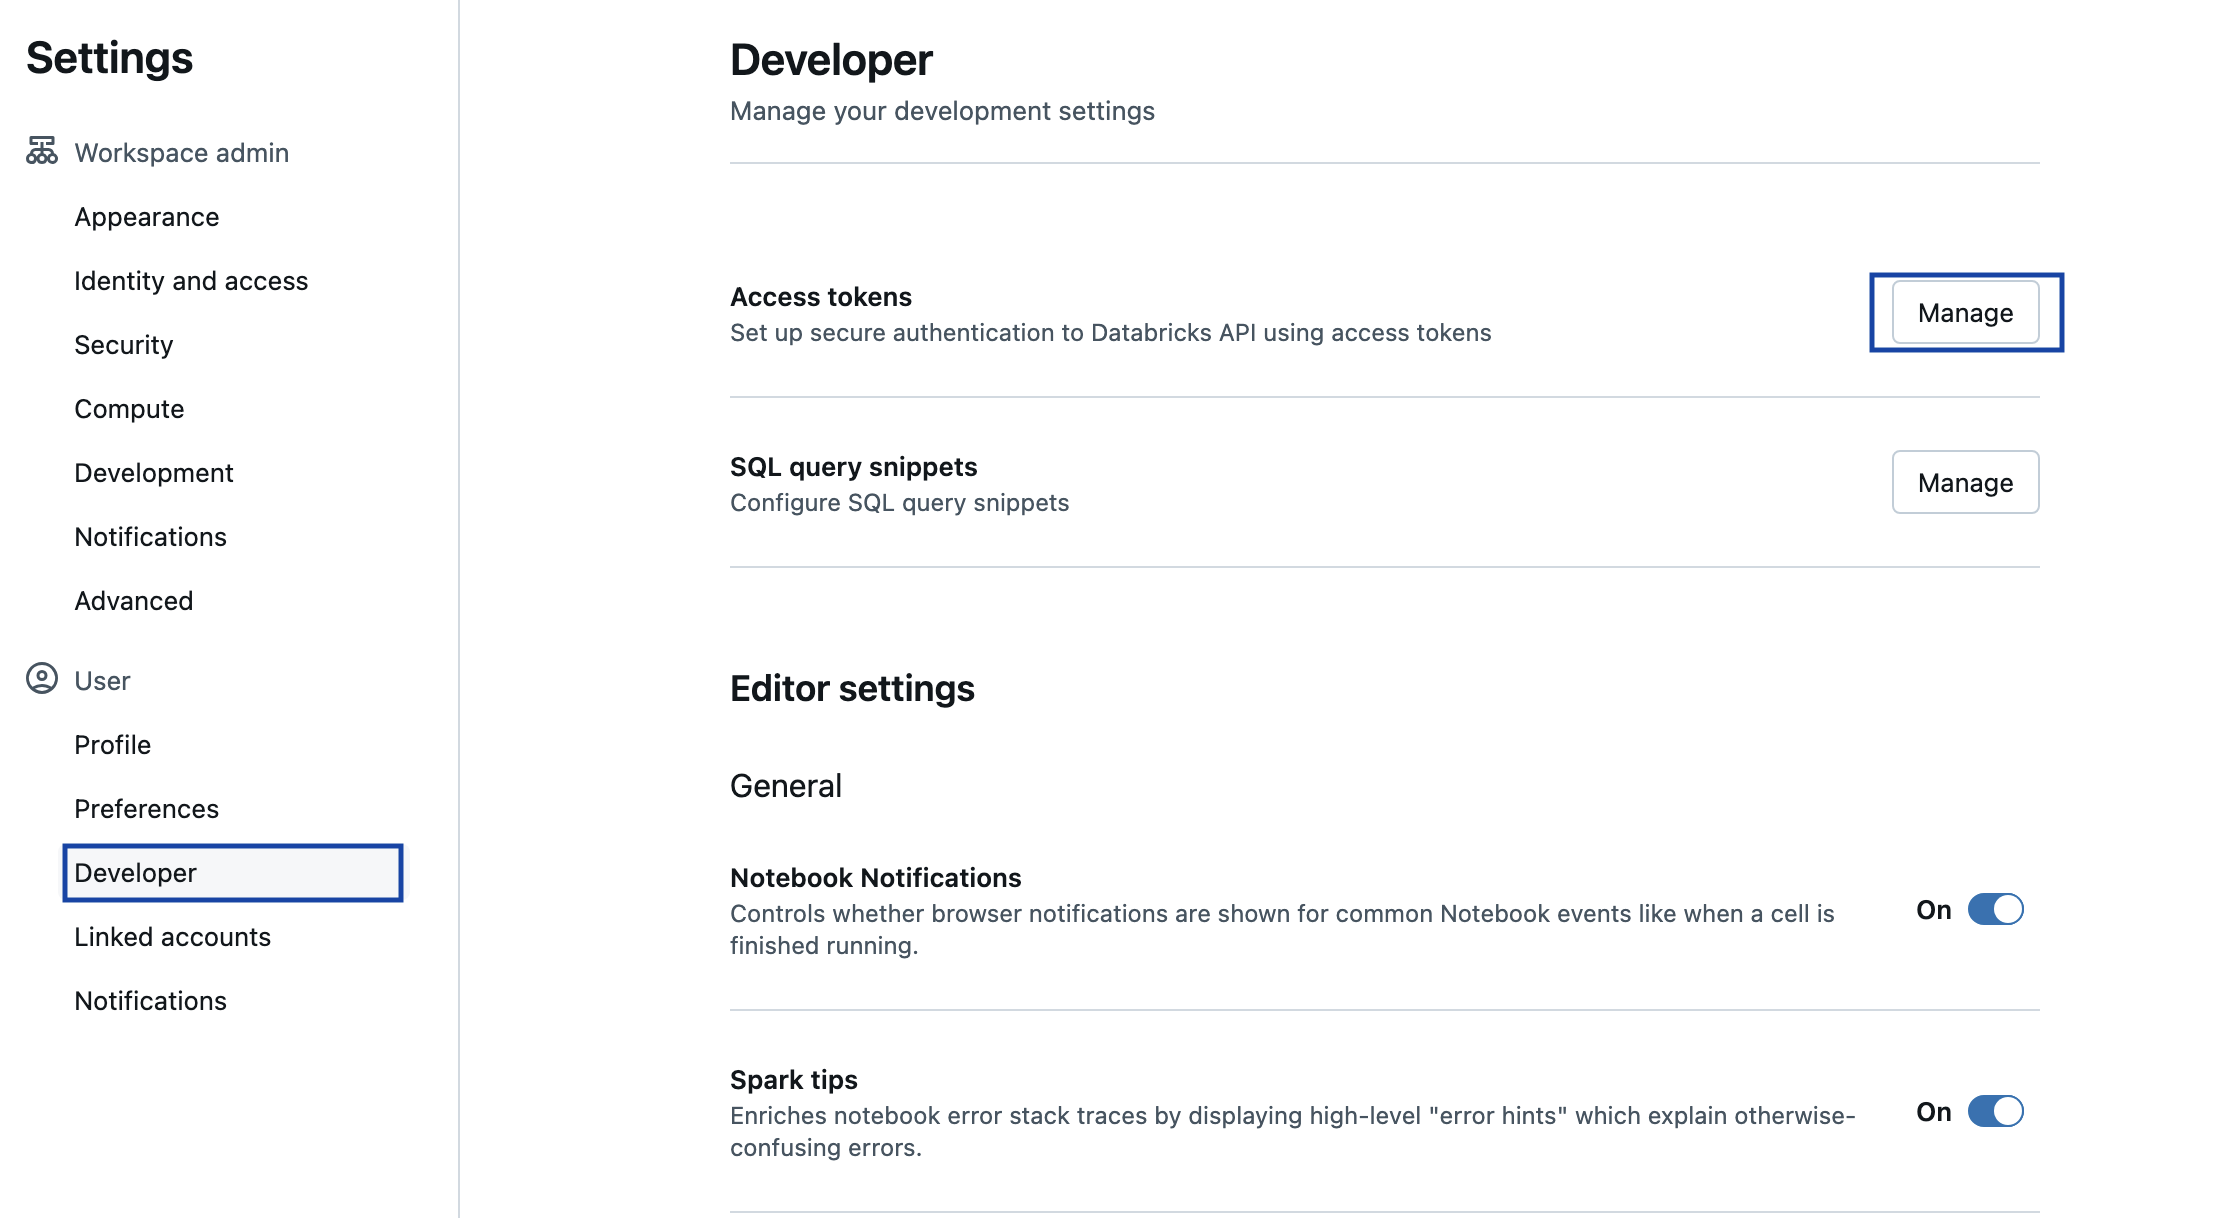
Go back to Databricks in the browser. Click on the email in the upper right corner of the Workspace, then click “User Settings”.
Click on Developer in the left-hand menu, then click on Manage under the Access tokens section
Click “Generate New Token” and enter a description for the token. Click “Generate” to create the token.
Copy the token. Go back to HTTPie and paste the token into the empty line.
Next, select the “Body” tab, and select “Text” at the bottom.
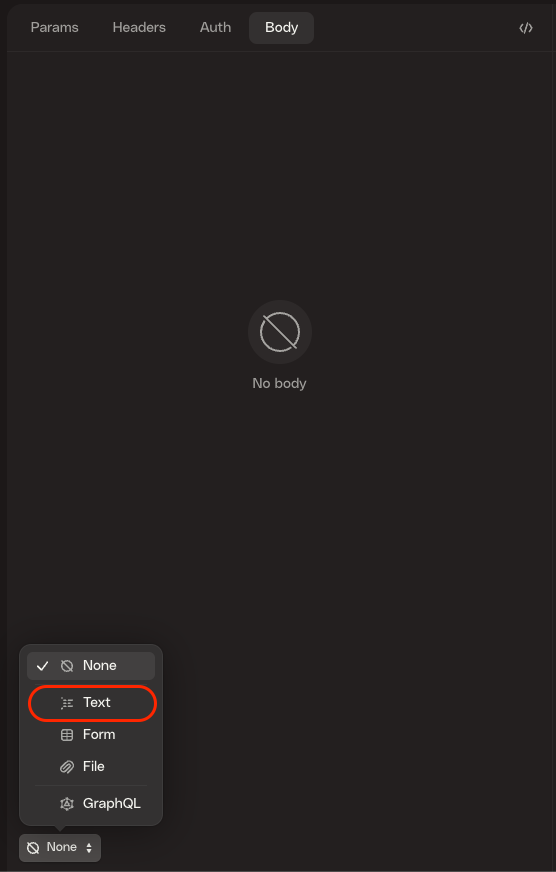
Once “Text” has been selected, an empty box will appear to put the text into. Copy-and-paste the following line into the text box:
{"enableDcs": "true"}
Finally, once URL, Auth, and Body have been filled in, click send. Green text should appear in the response section, with a response code of
204. Container services have now been enabled.In the Databricks workspace, refresh the window. Click on Compute, then click on the cluster that was created in the previous step.
Click on Edit, then scroll down to the Advanced Options section and expand it.
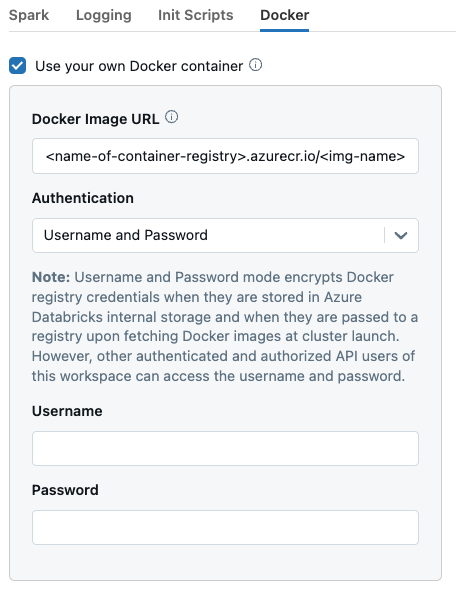
There should now be a Docker tab. Click on it, and then check Use your own Docker container.

4. Creating the custom geoenrichment Docker image#
Geoenrichment requires a custom docker image. This image uses the Databricks DBR image as a base, and adds a running postgres database to it. Download the custom dockerfile here: Dockerfile
Next, download and extract this zip file containing two PostgreSQL configuration files: postgres-conf.zip
Place the Dockerfile and the two PostgreSQL configuration files into the same directory.
In the directory created in the previous step, build the image locally with:
docker build -t <tag> -f DBR164.Dockerfile .and replace the<tag>with an image name of choice. If the image successfully builds, it is ready to be pushed to ACR for use in databricks.Note: This step may not work on some networks blocking keyserver ubuntu. If this occurrs, try using a less restrictive network. Contact the BDT team at bdt_support@esri.com if the problem persists.
5. Pushing the geoenrichment image to Azure Container Registry (ACR)#
If an Azure Container Registry is not already set up, see the quickstart guides here: https://learn.microsoft.com/en-us/azure/container-registry/
Install Azure CLI: https://learn.microsoft.com/en-us/cli/azure/install-azure-cli
Login to Azure CLI
az loginLogin to the Container Registry
az acr login --name <name-of-container-registry>Tag the image:
docker tag <local-image-id> <name-of-container-registry>.azurecr.io/<image-name>Push the image:
docker push <name-of-container-registry>.azurecr.io/<image-name>
For additional information about pushing to ACR see: Push your first image to your Azure container registry using the Docker CLI
6. Using the custom image in a databricks cluster#
Back to the cluster in Databricks, navigate to the docker tab that was previously enabled.
Paste in the URL to the image saved in ACR. It should follow a format similar to:
<name-of-container-registry>.azurecr.io/<image-name>Change Authentication to “Username and Password”
The Username and Password of the container registry can be found by navigating to the registry in Azure Portal and going to the “Access Keys” section.
7. Set Spark Properties#
Click on the Spark tab of the advanced options in the cluster.
Add the following properties to the Spark Config section:
spark.bdt.ge.port 5432
spark.bdt.ge.host localhost
spark.bdt.ge.user postgres
spark.bdt.ge.pass postgres
spark.bdt.ge.max.conns 600
spark.bdt.ge.database geoenrichment
If also using the LMDB for network analysis, add the following properties as well:
spark.bdt.lmdb.path /local_disk0/data/LMDB_<version>_<year>_<quarter>
spark.bdt.lmdb.map.size 304857600000
Under Instances turn on “Enable autoscaling local storage”
It is also recommended to turn Photon Acceleration OFF for clusters performing BDT enrichments.
Click Confirm or Create compute if this is a new cluster to save the changes.
8. Additional Libraries#
Two additional libraries are required for geoenrichment. They are:
hibernate-core
jython
To install these, navigate to the Libraries tab in the cluster.
Select “Install New” and then select the Maven option for “Library Source”.
For hibernate-core, enter
org.hibernate:hibernate-core:5.6.15.Finalinto the coordinates field and select install.For jython, repeat step 3 and then enter
org.python:jython-standalone:2.7.3into the coordinates field and select install.
9. Start the cluster#
This may take around 40 minutes to start. This is expected as the init script needs to load the postgres dump files into the postgres database on each cluster node.
Once the cluster has started, confirm that geoenrichment has been successfully installed by running the following in a notebook:
from bdt.processors import ba_variables, enrich, addShapeFromWKT

poly_df = (
            spark
                .createDataFrame(
                [("POLYGON((-8589916.801660 4722261.253987, -8559808.739548 4722117.817925, -8557660.375723 "
                  "4694677.577920, -8590986.920056 4694254.930233))",)], schema="WKT string")
                .addShapeFromWKT("WKT", "Polygon", 3857, keep=False)
        )

var_df = ba_variables()

out_df = enrich(poly_df,
                var_df,
                variable_field="Variable",
                sliding=20,
                shape_field="SHAPE")
out_df.show()
If the above code runs with no errors, then geoenrichment has been installed.