Parquet Toolbox#
The parquet toolbox allows for importing parquet folders exported from Spark or other data processes. It supports reading from Azure Blob Storage, Azure Delta Lake, Google Cloud Storage, and AWS S3.
The toolbox also features an export tool that allows for exporting a feature class from ArcGIS Pro to a parquet folder. It also supports exporting to the same cloud providers listed above.
Reach out to the BDT team to receive the Parquet Toolbox installation files.
Installation:#
The tool will work with no external dependencies when only using local files.
If working with data in cloud storage, additional packages are required. Follow the steps below.
Step 1 - Clone the base conda env in ArcGIS Pro:#
First, close out of ArcGIS Pro, open up the Python Command Prompt and do the following:
proswap arcgispro-py3conda create --yes --name spark_esri --clone arcgispro-py3proswap spark_esri
Step 2 - Install dependencies:#
Run the following conda install commands with the Python Command Prompt.
Azure:
conda install -c conda-forge adlfs.S3:
conda install -c conda-forge s3fs.Google Cloud Storage:
conda install -c conda-forge gcsfs.
Step 3 - Check dependencies:#
The following packages should already be installed from the base ArcGIS Pro conda env. Verify they are installed by checking by doing
conda list <package_name>. If they are not installed,conda installthem:pyarrowfsspec
Environment#
The following is a list of all the versions this tool was tested with:
Package |
ArcGIS Pro 3.4 |
|---|---|
python |
3.11.10 |
pyarrow |
16.1.0 |
fsspec |
2024.6.1 |
adlfs |
2022.7.0 |
gcsfs |
2024.6.1 |
s3fs |
2024.6.1 |
Import Tool Tests:#
Note: The amount of columns and partition size will influence the RAM usage and processing time of the tool. Since the tool reads each parquet partition from disk, only one partition at a time is loaded into memory at a time.
This is why the 10m test uses more RAM than the others as it has more columns.
Record Count |
Geometry Type |
Machine RAM Size |
Peak Memory Usage |
Processing Time |
|---|---|---|---|---|
10m |
Point |
64GB |
5GB |
9 mins |
40m |
Point |
64GB |
2.5GB |
13 mins |
58m |
Polygon |
64GB |
3.2GB |
27 mins |
158m |
Polygon |
64GB |
3.5GB |
1 hr |
Export Tool Tests:#
Record Count |
Geometry Type |
Machine RAM Size |
Peak Memory Usage |
Processing Time |
|---|---|---|---|---|
10m |
Point |
64GB |
2GB |
3 mins |
40m |
Point |
64GB |
3GB |
2 mins 30s |
58m |
Polygon |
64GB |
2.5GB |
14 mins |
158m |
Polygon |
64GB |
3GB |
37 mins |
Import Tool Usage:#
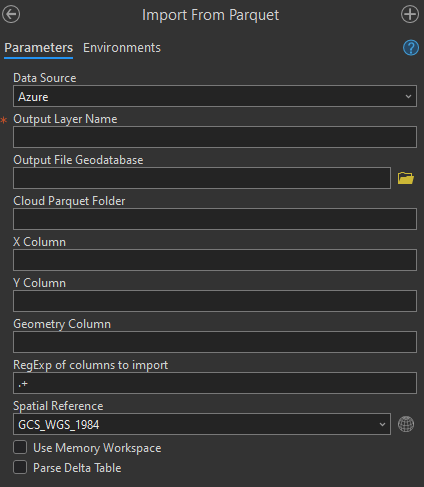
Data Source:#
Set this the location of your data
Possible options are:
Local,S3,Azure, andGoogle Cloud Storage
Output Layer Name:#
The output feature class layer name which will appear in your catalog once the tool is complete.
Output File Geodatabase:#
By default the tool will output the feature class to a scratch gdb. Set this to the path of a specific gdb to override this.
Local Parquet Folder:#
This parameter is an input path to a local hive partitioned parquet folder (must be a folder. Tool does not support singular parquet files).
Must be an absolute path with format
Drive:\path\to\your\parquetEx:C:\Users\dre11620\Downloads\tester.parquet. No env variables required.
Cloud Parquet Folder:#
This parameter is an input path to a cloud hive partitioned parquet folder (must be a folder. Tool does not support singular parquet files).
A local or cloud folder path must be defined as input to the tool. An error will be thrown if both folder paths are defined.
It can be one of the following:
Azure path
Must be in one of these formats:
azfor Azure Blob Storage -az://<containername>/<pathtoparquet>Ex:az://main/mydata.parquetabfssfor Azure Data Lake Storage (ADLS) -abfss://<containername>/<pathtoparquet>Ex:abfss://main/mydata.parquetOr
abfsfor Azure Data Lake Storage (ADLS) -abfs://<containername>/<pathtoparquet>Ex:abfs://main/mydata.parquet
Must have environment variable on your machine called
AZURE_CONN_STR:With the format:
DefaultEndpointsProtocol=https;AccountName=<youraccount>;AccountKey=<yourkey>==;EndpointSuffix=core.windows.net.You can find this key under your storage account on the Azure portal under
Security+networking->Access keys->Connection String.
Google cloud storage path
Must be in the format -
gs://<bucketname>/<pathtoparquet>Ex:gs://sdsdrewtest/myfile.parquet.Or
gcs-gcs://<bucketname>/<pathtoparquet>Ex:gcs://sdsdrewtest/myfile.parquet.Must have environment variable on your machine called
GOOGLE_APPLICATION_CREDENTIALSthat is path to a google access key json file.You can find this key under
IAM & Admin->Service Accounts. Create a service account if you don’t already have one and then press the 3 dots to selectManage Keys. Creating a key will download a json file to your machine.
AWS S3
Must be in the format -
s3://<bucketname>/<pathtoparquet>Ex:s3://sdsdrewtest/myfile.parquet.Must have the following env variables set:
AWS_ACCESS_KEY_ID,AWS_SECRET_ACCESS_KEY.You can optionally set
AWS_REGIONenv variable.If using temp credentials you will need to also have
AWS_SESSION_TOKENset.If using minio locally you will need to set
AWS_ENDPOINT_URLset. Ex:127.0.0.1:9000.
X and Y Column:#
Set these columns if you have point geometries that you would like to import from two columns.
Example:
X=pickup_longitude,Y=pickup_latitiude
Geometry Column:#
If not using X and Y columns, the tool will look for a geometry column.
If your data has no geometry, it can be loaded in as an attribute table by leaving all geometry params empty.
The tool supports three types of columns:
WKB - Well-Known Binary. Set this parameter to the name of your WKB column.
WKT - Well-Known Text. Set this parameter to the name of your WKT column.
Esri Big Data Toolkit SHAPE Struct - Example: SHAPE{WKB, XMIN, YMIN, XMAX, YMAX}. Set this parameter to the name of your struct column separated with a period with the name of your WKB key within the struct. Ex:
MyStruct.myWKB
Column Selection:#
Warning - Columns with array values are not supported. Columns with int64 longs are only supported up to 53 bits, more information here. Use regular expressions to filter out any problematic columns.
Set a regular expression to only import the desired columns specified. Ex:
(VendorID|RatecodeID).You do not need include the shape column in the RegEX as it will be added automatically based on the inputs of WKB column name or X/Y column names.
The tool is able to detect and remove @ symbols from column names but it is recommended to avoid special characters in column names.
Spatial Reference:#
Set to SR of your geometry data.
Memory:#
If checked will write FC to memory workspace, otherwise will write the FC to scratchGDB or output GDB path.
Export Tool Usage:#
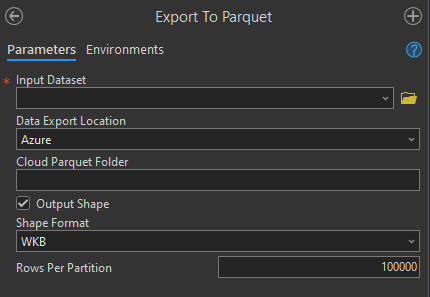
Data Export Location:#
Set this the location of where you want to export your data
Possible options are:
Local,S3,Azure, andGoogle Cloud Storage
Input Dataset:#
The input FC to be exported.
Local Parquet Folder:#
This parameter is an output path to a local parquet folder.
Must be an absolute path with format
Drive:\path\to\your\parquetEx:C:\Users\dre11620\Downloads\tester.parquet. No env variables required.
Cloud Parquet Folder:#
This parameter is an output path to a cloud parquet folder.
A local or cloud folder path must be defined as input to the tool. An error will be thrown if both folder paths are defined.
It can be one of the following:
Azure path
Must be in one of these formats:
azfor Azure Blob Storage -az://<containername>/<pathtoparquet>Ex:az://main/mydata.parquetabfssfor Azure Data Lake Storage (ADLS) -abfss://<containername>/<pathtoparquet>Ex:abfss://main/mydata.parquetOr
abfsfor Azure Data Lake Storage (ADLS) -abfs://<containername>/<pathtoparquet>Ex:abfs://main/mydata.parquet
Must have environment variable on your machine called
AZURE_CONN_STR:With the format:
DefaultEndpointsProtocol=https;AccountName=<youraccount>;AccountKey=<yourkey>==;EndpointSuffix=core.windows.net.You can find this key under your storage account on the Azure portal under
Security+networking->Access keys->Connection String.
Google cloud storage path
Must be in the format -
gs://<bucketname>/<pathtoparquet>Ex:gs://sdsdrewtest/myfile.parquet.Or
gcs-gcs://<bucketname>/<pathtoparquet>Ex:gcs://sdsdrewtest/myfile.parquet.Must have environment variable on your machine called
GOOGLE_APPLICATION_CREDENTIALSthat is path to a google access key json file.You can find this key under
IAM & Admin->Service Accounts. Create a service account if you don’t already have one and then press the 3 dots to selectManage Keys. Creating a key will download a json file to your machine.
AWS S3
Must be in the format -
s3://<bucketname>/<pathtoparquet>Ex:s3://sdsdrewtest/myfile.parquet.Must have the following env variables set:
AWS_ACCESS_KEY_ID,AWS_SECRET_ACCESS_KEY.You can optionally set
AWS_REGIONenv variable.If using temp credentials you will need to also have
AWS_SESSION_TOKENset.If using minio locally you will need to set
AWS_ENDPOINT_URLset. Ex:127.0.0.1:9000.
Output Shape:#
If you don’t want to include geometries in the output parquet, uncheck this box.
Shape Format:#
If outputting shape column, 3 formats are supported:
"WKT", "WKB", "XY".The shape column will be named
"ShapeWKT", "ShapeWKB", "ShapeX", "ShapeY"
Rows Per Partition:#
Rows per partition controls the minimum number of rows in a Parquet row group. The default is 100,000 rows per group.
Import Tool S3 Usage Example:#
Step 1 - Set AWS Environment variables#
Be sure to have the following env variables set:
AWS_ACCESS_KEY_ID,AWS_SECRET_ACCESS_KEY.To set them search for
Environment variablesin WindowsIf using temp credentials you will need to also have
AWS_SESSION_TOKENset.Restart Pro after settting these.
Step 2 - Open the toolbox:#
Open
ParquetToolbox.pytand selectImport From Parquet
Step 3 - Input parquet folder path:#
This parameter is a path to your hive partitioned parquet folder (must be a folder. Tool does not support singular parquet files).
example for AWS s3 -
s3://<bucketname>/<pathtoparquet>Ex:s3://sdsdrewtest/myfile.parquet.
Step 4 - Set Output Layer Name:#
The output feature class layer name which will appear in your catalog once the tool is complete.
Step 5 - Geometry Column:#
We can define our geometry column for the tool.
The tool supports three types of columns:
WKB - Well-Known Binary. Set this parameter to the name of your WKB column.
WKT - Well-Known Text. Set this parameter to the name of your WKT column.
Esri Big Data Toolkit SHAPE Struct - Example: SHAPE{WKB, XMIN, YMIN, XMAX, YMAX}. Set this parameter to the name of your struct column separated with a period with the name of your WKB key within the struct. Ex:
MyStruct.myWKB
Step 6 - Set Spatial Reference:#
Set to SR of your geometry data.
Step 7 - Run the tool:#
The tool should now log details about the import process